

Razorpay
Accept payments in your apps with your own Razorpay account.
Razorpay is a payment gateway for India. Connect your Razorpay account once, and the agent can add one-time payments, subscriptions and paywalls to any app in your workspace. Payments go straight to your Razorpay account.
Razorpay is available for India only, and payments are in INR.
Connecting Razorpay
Open Settings → Integrations and find Razorpay.
Click Connect, log in to Razorpay and approve Ideavo's access.
Return to Ideavo. The row shows your account ID and (test mode).
You can also connect from the chat: when the agent needs Razorpay and it isn't connected yet, it shows a Connect button.
Only the workspace owner can connect, renew or disconnect Razorpay. The connection is shared by every project in the workspace.
Ideavo always connects in test mode, where no real money moves. Ideavo never requests or stores live credentials. To accept real payments, you set your own live keys on your host, as described in Going Live.
Renewing Access
Ideavo's access to your Razorpay account lasts about 90 days. In the last 10 days, Settings → Integrations shows the expiry date and a Renew now link.
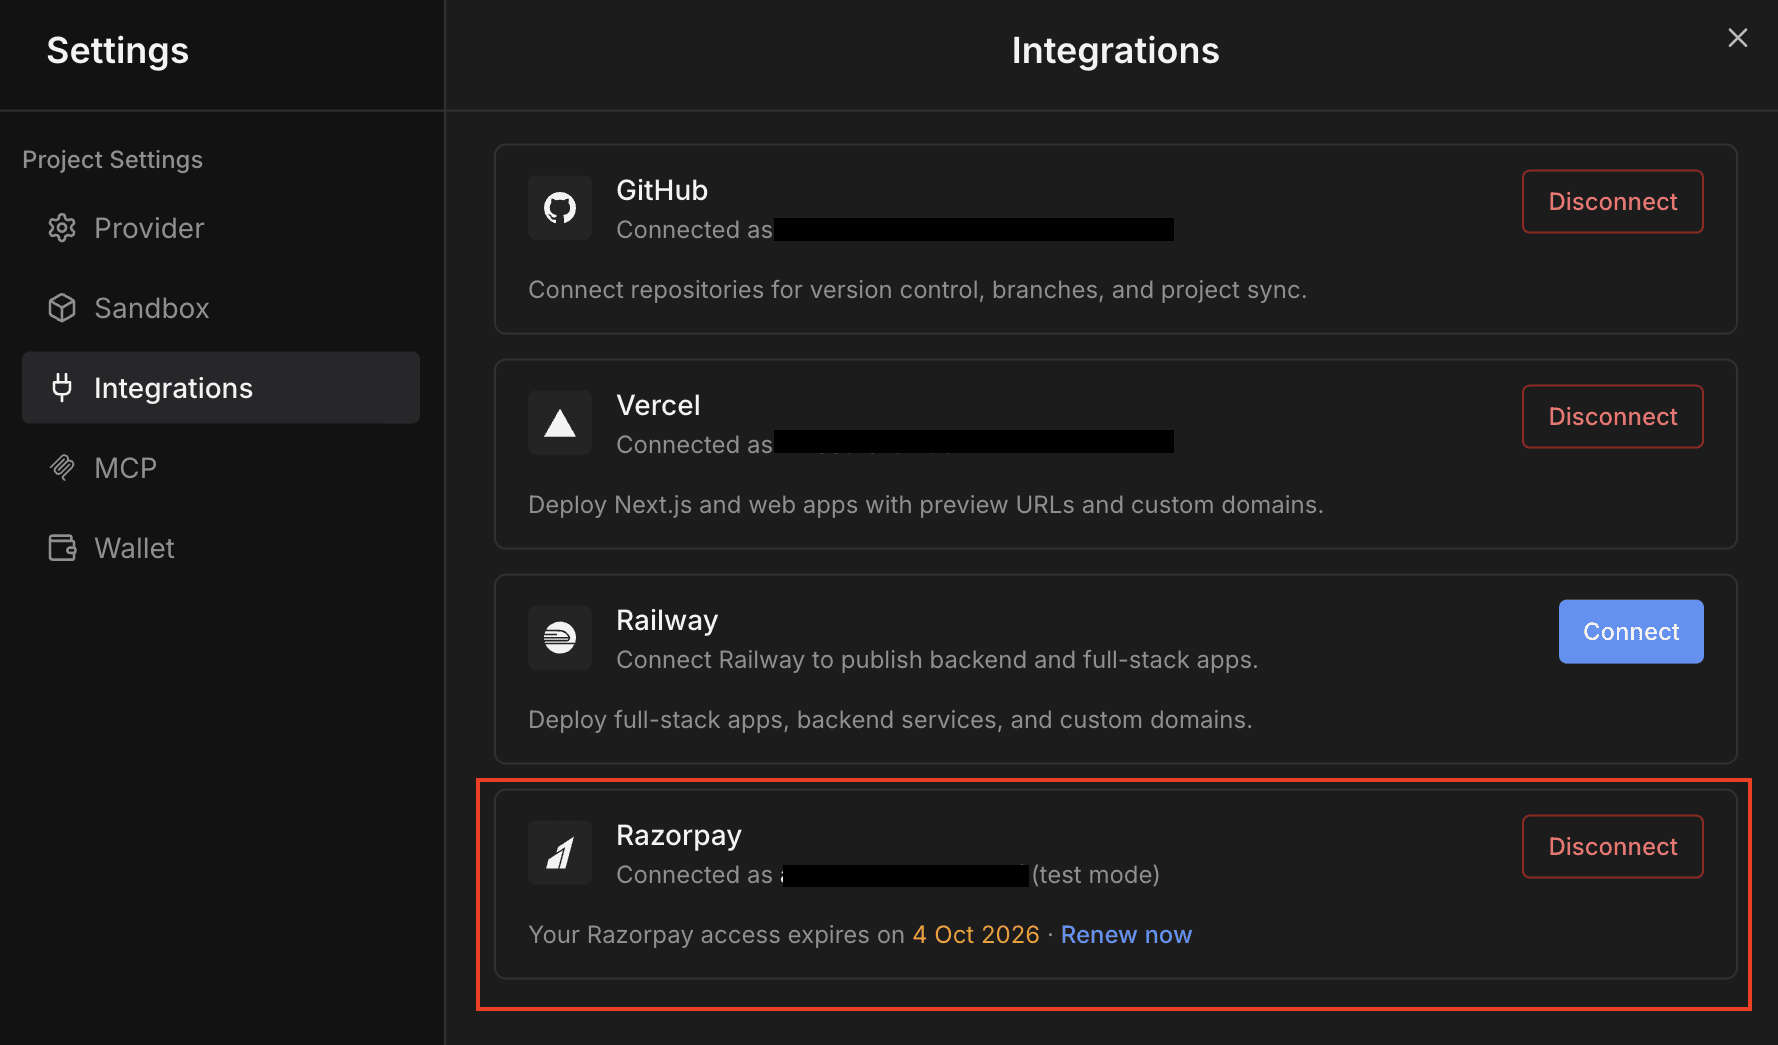
Click Renew now. Ideavo gets fresh access without you logging in again.
Ask the agent to update the Razorpay access token in each app that uses it.
If a deployed app still runs on test credentials, redeploy it so the new token reaches your host.
If access has been revoked from your Razorpay Dashboard, renewing disconnects Razorpay, and you connect it again.
Adding Payments to Your App
Ask in the chat, for example "add a ₹499 Pro plan". Here's what happens:
The agent checks your app. Payments need a server, a database and sign-in. If any are missing, it tells you what to add first.
It asks a few questions, such as what you sell and for how much, one-time or subscription, and what paid users get.
It builds the payment flow and writes the test credentials to your
project's .env.
You test it with a test payment, then register the webhook.
Your app ends up with:
| Part | What it does |
|---|---|
| Checkout | Opens Razorpay's payment window from your Buy button. |
| Payment check | Your server confirms every payment with Razorpay before unlocking anything. |
| Access checks | Paid pages and APIs stay locked for users who haven't paid. |
| Plan page | Shows the plans, the user's current plan and their payment history. |
| Webhook | Receives payment events from Razorpay, covered below. |
Prices are set on your server, not in the browser, so a tampered amount or a faked payment is rejected.
Testing Payments
Test mode works like the real thing, but no money moves. Every test payment shows up in the Razorpay Dashboard under Payments, with Test Mode switched on.
Test cards
Card numbers for successful payments, declines and other errors.
Test UPI IDs
UPI IDs that always succeed or always fail.
Choose UPI at checkout and enter success@razorpay for a successful
payment, or failure@razorpay for a failed one.
What to check:
- A successful payment unlocks what the user paid for.
- A failed payment leaves it locked, and the user can try again.
- Closing the payment window returns to the Buy button.
- Paid pages and their APIs stay locked for users who haven't paid.
Webhooks
A webhook is how Razorpay tells your app about a payment directly, server to server. Your app stays correct even if the buyer closes the tab before the payment is confirmed, and subscription renewals are recorded without the buyer coming back.
The agent always builds the webhook endpoint in your app. You connect it in the Razorpay Dashboard, because Ideavo can't do that for you.
Webhooks live in two places
Razorpay uses one page to create webhooks and a different page to see the events they received. Creating a webhook never shows its events.
| To | Open |
|---|---|
| Create or edit a webhook | Account & Settings → Webhooks |
| See the events it received | Developers → Webhooks, then select the webhook |
Create the Webhook
Open Add New Webhook
and switch to Test Mode. When asked for an OTP in test mode, enter
754081.
Enter a public HTTPS URL: your deployed or preview URL plus the handler
path the agent gave you, for example /api/webhooks/razorpay. Razorpay
rejects localhost.
Select only the events the agent listed. If your app has subscriptions, include the subscription events.
Choose a secret, and set the same value as RAZORPAY_WEBHOOK_SECRET in the
Secrets tab and on your host.
See the Events
Open Developers → Webhooks, in the same mode as your payment.
Click your webhook to see each event Razorpay sent and your app's response.
The list is empty until a payment happens after the webhook was created. Razorpay never sends events from before that.
Checklist
- The webhook exists. It's listed under Account & Settings → Webhooks, in the right mode (Test or Live), and enabled.
- The secrets match. The secret in the Dashboard and
RAZORPAY_WEBHOOK_SECRETin your app are exactly the same. If they differ, every event is rejected with a 400. - Only the events your app handles are enabled. Extra events are just noise.
- Subscription events are enabled if your app sells subscriptions, or renewals and cancellations never reach it.
- The signature is verified. The endpoint checks every event's signature before accepting it. Never remove that check, or anyone could fake a payment.
How Events Are Handled
Verified
Every event's signature is checked with your webhook secret. Anything that fails is rejected.
Idempotent
Razorpay can send an event more than once or out of order. Repeats change nothing, and statuses only move forward.
Scoped
Only events for payments your app created are acted on. Everything else is acknowledged and ignored.
The endpoint answers within 5 seconds. If it fails, Razorpay retries for 24 hours, then disables the webhook and emails you.
Security
RAZORPAY_ACCESS_TOKENandRAZORPAY_KEY_SECRETstay on the server. Only the key ID reaches the browser.- Never paste Razorpay credentials into the chat.
- Each payment is confirmed by fetching it from Razorpay, never by trusting the browser.
Going Live
Live payments use your own API keys, which you generate and set on your host. The agent never handles them, and the same code works with test and live credentials.
Get Your Live Keys
Complete Razorpay's account activation (KYC), so live payments are enabled. Check the documents your business type needs first.
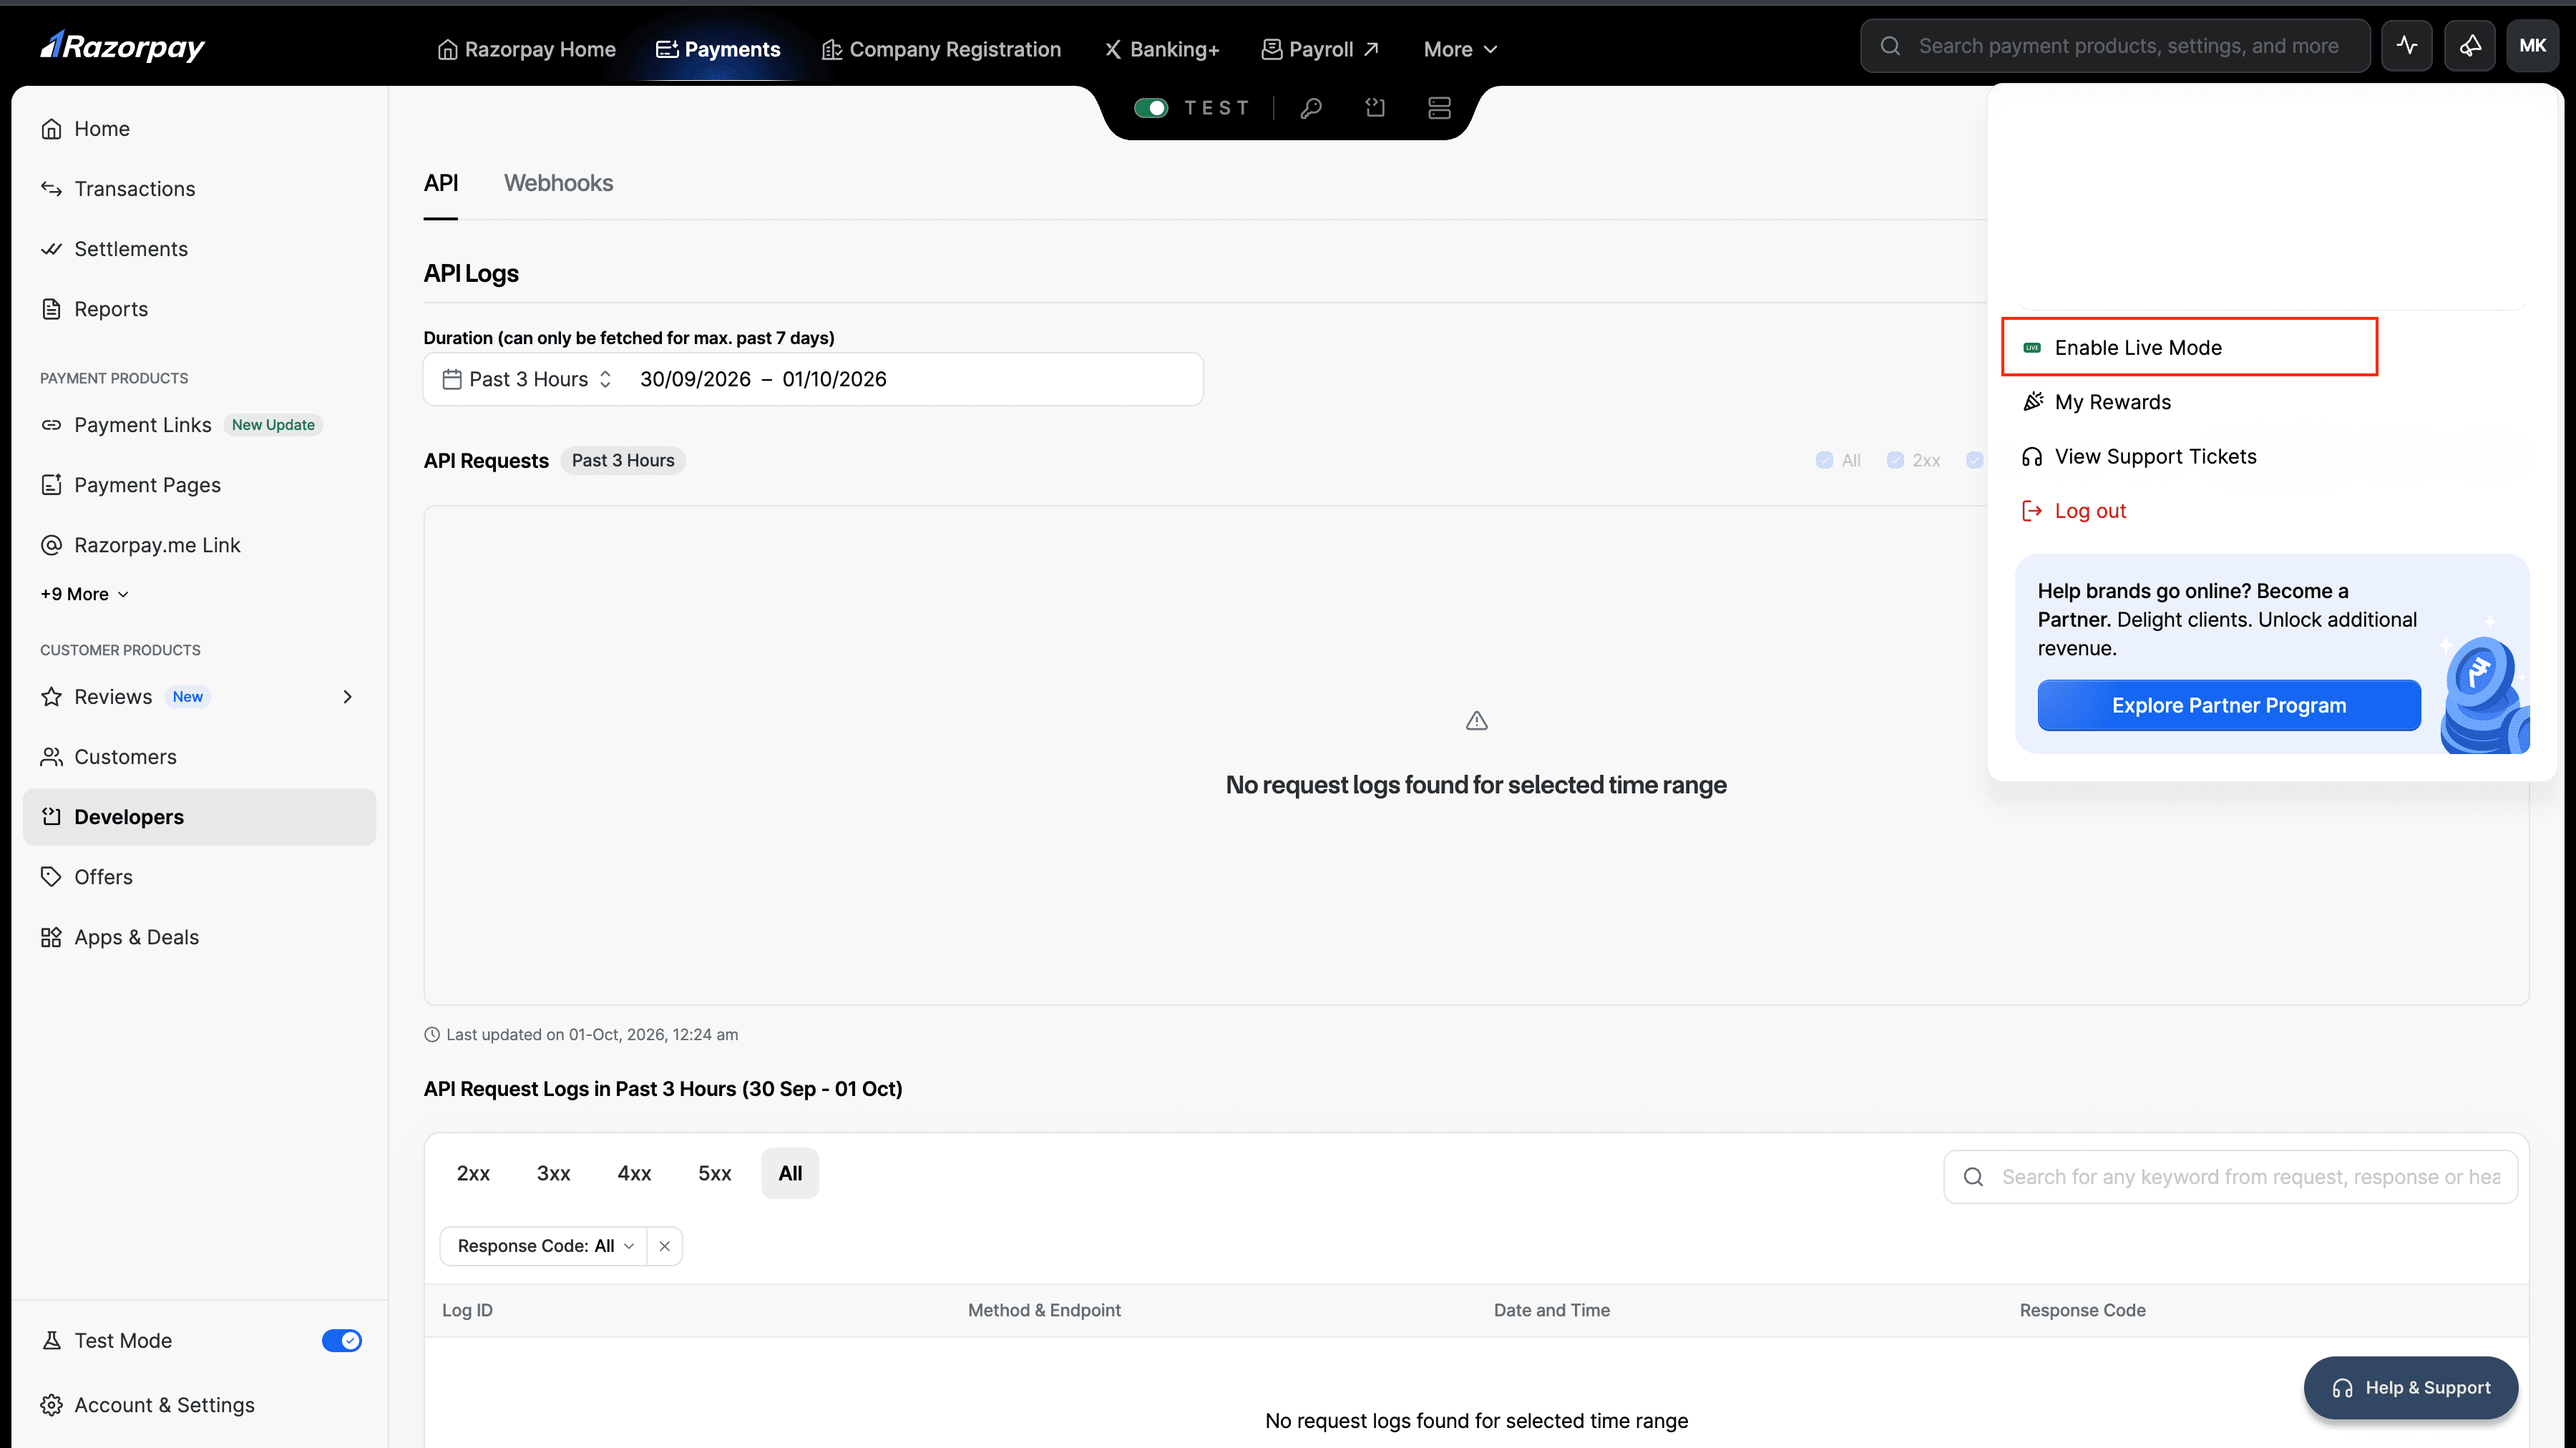
Switch the Dashboard to Live Mode: open your profile menu in the top right and choose Enable Live Mode, or turn off the Test toggle at the top centre.
Open Account & Settings → API Keys → Generate Key. Copy the secret right away: it's shown only once. See Razorpay's API keys guide.
Set Up Live Mode
Test and live are separate in Razorpay, so repeat these in Live Mode:
- Webhook: in Live Mode, add a webhook the same way, with your production URL, the same events and a new secret. Live Mode asks for a real OTP instead of
754081. - Subscription plans: if you sell subscriptions, create the same plans. Live plan IDs differ from test ones.
Update Your Host
Set these on Vercel or Railway, then redeploy there. The public key ID is built into the app, so it needs a new build.
| Variable | Live value |
|---|---|
RAZORPAY_KEY_ID | Your live key ID (rzp_live_…) |
NEXT_PUBLIC_RAZORPAY_KEY_ID or VITE_RAZORPAY_KEY_ID | The same live key ID |
RAZORPAY_KEY_SECRET | Your live key secret (new) |
RAZORPAY_WEBHOOK_SECRET | The live webhook's secret |
RAZORPAY_PLAN_ID_… | The live plan IDs, for subscriptions |
RAZORPAY_ACCESS_TOKEN, RAZORPAY_ACCOUNT_ID | Delete both |
Every deploy from Ideavo sends your test credentials again and replaces the live ones on your host. A mix of test and live values makes payments fail. Set the Razorpay variables again after every deploy from Ideavo. See Production Environment.